Create a static blog with Hugo and GitHub Pages
One of the many things on my to-do list was to migrate my blog away from Wix and convert it to a static site instead. However, I put this task on hold because I didn’t have much time in the past. Now that I have some time, I finally decided to migrate my blog to a static site using Hugo and GitHub pages! The upcoming renewal cost from Wix also pushed me to do this because they have increased the fees.
I have been using Wix since 2019, which has helped me grow this blog. It was intuitive and easy to use, and I didn’t have to write a single line of code. It’s great to use if you are just getting started with blogging. However, I experienced that my blog was much slower to load, and there were accessibility issues as well. I also wanted to have complete control of my blog, so I finally took the time to convert my blog to a static site. Static sites offer better performance and accessibility since no server-side processing is involved, and it also has simpler HTML structures, which is always great news for your SEO!
So, if you are also thinking of migrating away from Wix, Wordpress, or other content management systems, then you might find this post useful.
What is Hugo?
Hugo is a popular, open-source static site generator built with Go, which is well-known for its performance. Hugo has different themes, so you can quickly start. What I like the most about Hugo is that I can write my blog posts using markdown files, and Hugo will natively render the markdown files to HTML pages.
What is GitHub Pages?
GitHub pages is a feature provided by GitHub that allows you to host static sites directly from a GitHub repository. It’s free and super simple to use! GitHub pages can also automatically update your site every time you push the changes to your main branch, and since it’s all in version control, you don’t have to worry about missing any changes.
Steps to create a blog with Hugo and GitHub Pages
After a bit of googling, here are the steps I followed to migrate my blog to a static site using Hugo and GitHub pages.
Create a GitHub repository
- Go to GitHub
- Create a new public repository named
username.github.io, whereusernameis your GitHub username. In my case, this wasmdcruz.github.io.
And, that’s it! It’s pretty simple.
Install Hugo
Next, you need to install Hugo. I am on macOS, so the easiest way for me to install Hugo is via Homebrew. To install, run the following command:
brew install hugo
For other operating systems, please refer to Hugo’s installation documentation.
Create a new site and select a theme
To create a new site and select a theme, run the following commands, replacing mdcruz.github.io with your own:
hugo new site mdcruz.github.io
cd mdcruz.github.io
git init
git submodule add --depth=1 https://github.com/canhtran/maverick.git themes/maverick
echo "theme = 'maverick'" >> hugo.toml
hugo server
The following commands do the following:
- Create a new Hugo site called
mdcruz.github.iowith all the default project structures - Go to the
mdcruz.github.iofolder - Initialise git
- Add the Maverick theme as a git submodule, which means adding a different repository as a subdirectory of another repository
- Add the maverick theme to the
hugo.tomlfile - Start the Hugo server
I chose the Maverick theme, but you can select other themes and follow the installation instructions on their GitHub repository.
Your local static site should now be running at http://localhost:1313/.
Configure Hugo site
The hugo.toml file is your configuration file to update your Hugo site. Depending on your chosen theme, the configuration file could also be a YAML or JSON file. It’s best to check the configuration setup for your chosen theme. Since I am using the Maverick theme, I copied the example configuration file from themes/maverick/exampleSite/config.toml and updated the different keys with the values appropriate to my configuration.
Important keys I updated were:
baseURL- set to my custom domain namelanguageCode- set toen-gbparams.description- set to my blog descriptionparams.author- set to my name
Add an index page
To add an index page, create a new markdown file called _index.md within the content folder and update it as you like. Check out themes/maverick/exampleSite/content/_index.md for an example index page.
To update the title, update the title key from hugo.toml file.
Add first blog post
To add a new blog post, create a new folder called posts within the content folder and add a new markdown file. Check out themes/maverick/exampleSite/posts/example-content.md for an example blog post.
Feel free to update the following metadata:
---
author: "Marie Cruz"
title: "Example Content"
date: "2024-11-25"
tags:
- hugo
- sample
---
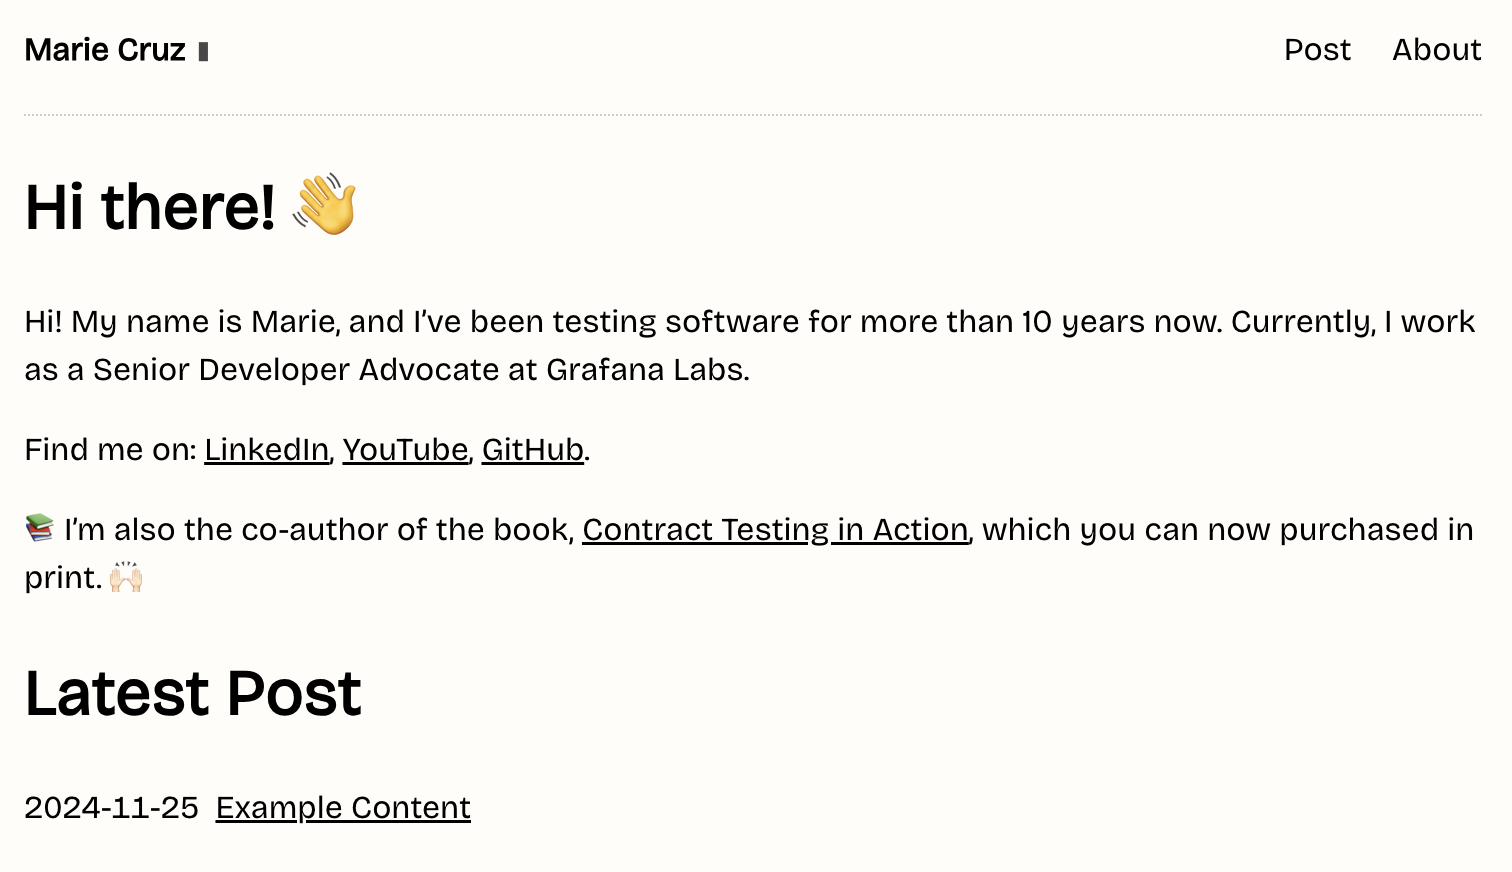
The index page should now look similar to the screenshot below:

Add different pages
Currently, there are two other pages: Post and About. To create a new about page, create a new folder called pages within the content folder, add a new markdown file called about.md, and update the file as you like! Check out themes/maverick/exampleSite/content/pages/about.md for an example about page.
To create a brand new page, update the [[menu]] options from the hugo.toml file and add the different pages as you wish. For example, the code snippet below shows the other pages I want to have:
[menu]
  [[menu.main]]
    identifier = "about"
    name = "About"
    url = "/about/"
  [[menu.main]]
    identifier = "courses"
    name = "Courses"
    url = "/courses/"
  [[menu.main]]
    identifier = "posts"
    name = "Posts"
    url = "/posts/"
  [[menu.main]]
    identifier = "speaking"
    name = "Speaking"
    url = "/speaking/"
The next step is to create markdown files for the new pages like courses.md and speaking.md and update the files as you wish.
When you are done with all the changes, just push it to your GitHub repository.
Set up GitHub Actions
Once your changes are pushed to GitHub, you need to make some adjustments to the settings page. In your GitHub repository, navigate to Settings > Pages.
Under Build and Deployment, update the source from Deploy from a branch to GitHub Action, as shown in the screenshot below.

To automatically build and deploy your site to GitHub pages, you need to set up a workflow for GitHub Actions. In your local repository, create a new folder called .github/workflows and add hugo.yaml file with the following contents:
# Sample workflow for building and deploying a Hugo site to GitHub Pages
name: Deploy Hugo site to Pages

on:
  # Runs on pushes targeting the default branch
  push:
    branches:
      - main

  # Allows you to run this workflow manually from the Actions tab
  workflow_dispatch:

# Sets permissions of the GITHUB_TOKEN to allow deployment to GitHub Pages
permissions:
  contents: read
  pages: write
  id-token: write

# Allow only one concurrent deployment, skipping runs queued between the run in-progress and latest queued.
# However, do NOT cancel in-progress runs as we want to allow these production deployments to complete.
concurrency:
  group: "pages"
  cancel-in-progress: false

# Default to bash
defaults:
  run:
    shell: bash

jobs:
  # Build job
  build:
    runs-on: ubuntu-latest
    env:
      HUGO_VERSION: 0.137.1
    steps:
      - name: Install Hugo CLI
        run: |
          wget -O ${{ runner.temp }}/hugo.deb https://github.com/gohugoio/hugo/releases/download/v${HUGO_VERSION}/hugo_extended_${HUGO_VERSION}_linux-amd64.deb \
          && sudo dpkg -i ${{ runner.temp }}/hugo.deb
      - name: Install Dart Sass
        run: sudo snap install dart-sass
      - name: Checkout
        uses: actions/checkout@v4
        with:
          submodules: recursive
          fetch-depth: 0
      - name: Setup Pages
        id: pages
        uses: actions/configure-pages@v5
      - name: Install Node.js dependencies
        run: "[[ -f package-lock.json || -f npm-shrinkwrap.json ]] && npm ci || true"
      - name: Build with Hugo
        env:
          HUGO_CACHEDIR: ${{ runner.temp }}/hugo_cache
          HUGO_ENVIRONMENT: production
          TZ: America/Los_Angeles
        run: |
          hugo \
            --gc \
            --minify \
            --baseURL "${{ steps.pages.outputs.base_url }}/"
      - name: Upload artifact
        uses: actions/upload-pages-artifact@v3
        with:
          path: ./public

  # Deployment job
  deploy:
    environment:
      name: github-pages
      url: ${{ steps.deployment.outputs.page_url }}
    runs-on: ubuntu-latest
    needs: build
    steps:
      - name: Deploy to GitHub Pages
        id: deployment
        uses: actions/deploy-pages@v4
The above content was taken from Hugo’s documentation. For more information, please refer to Host on GitHub Pages.
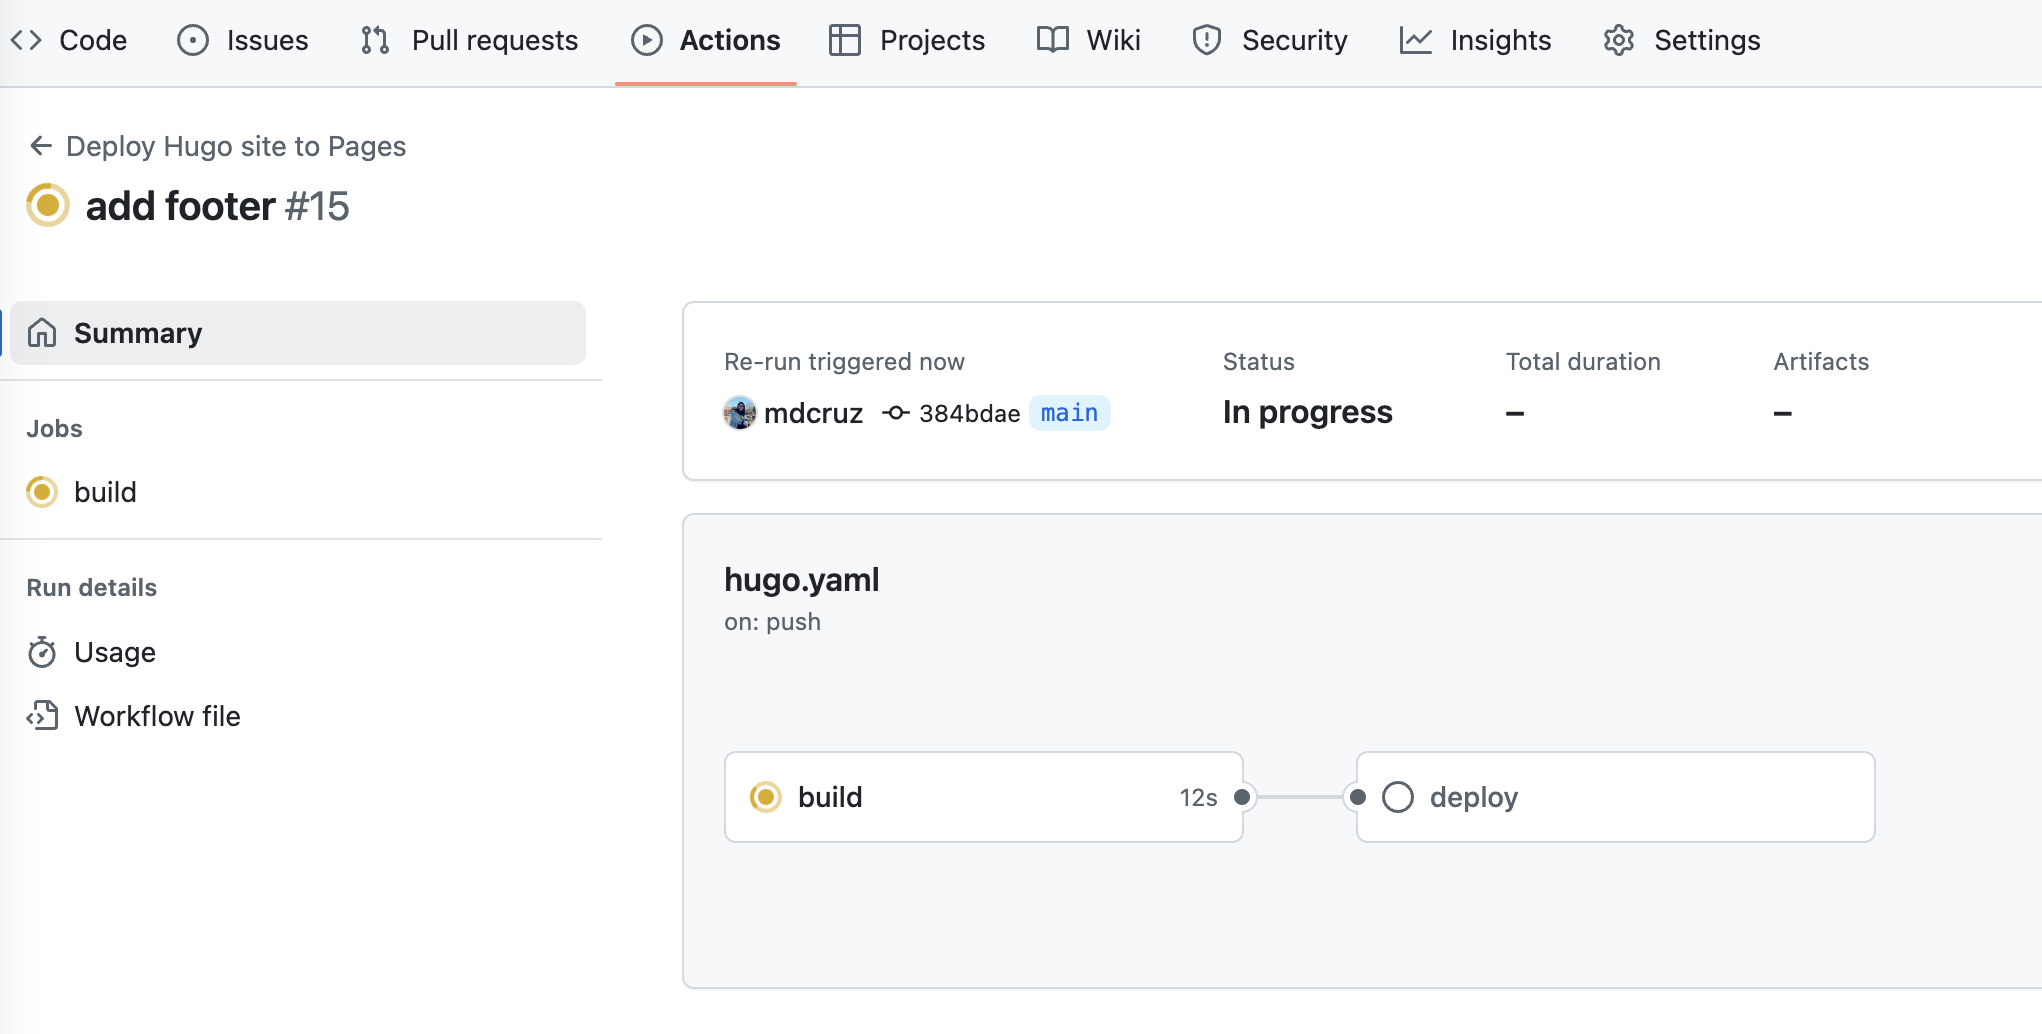
Now, push all the changes to your GitHub repository. This should trigger the workflow automatically, and your site should now be published to https://<username>.github.io.
You can see the workflow by navigating to Actions, as shown in the screenshot below.

Set up custom domain
To set up your custom domain, navigate to Settings > Pages again and add your domain under the custom domain field. GitHub will create a file called CNAME containing the custom domain and commit it to your repository.

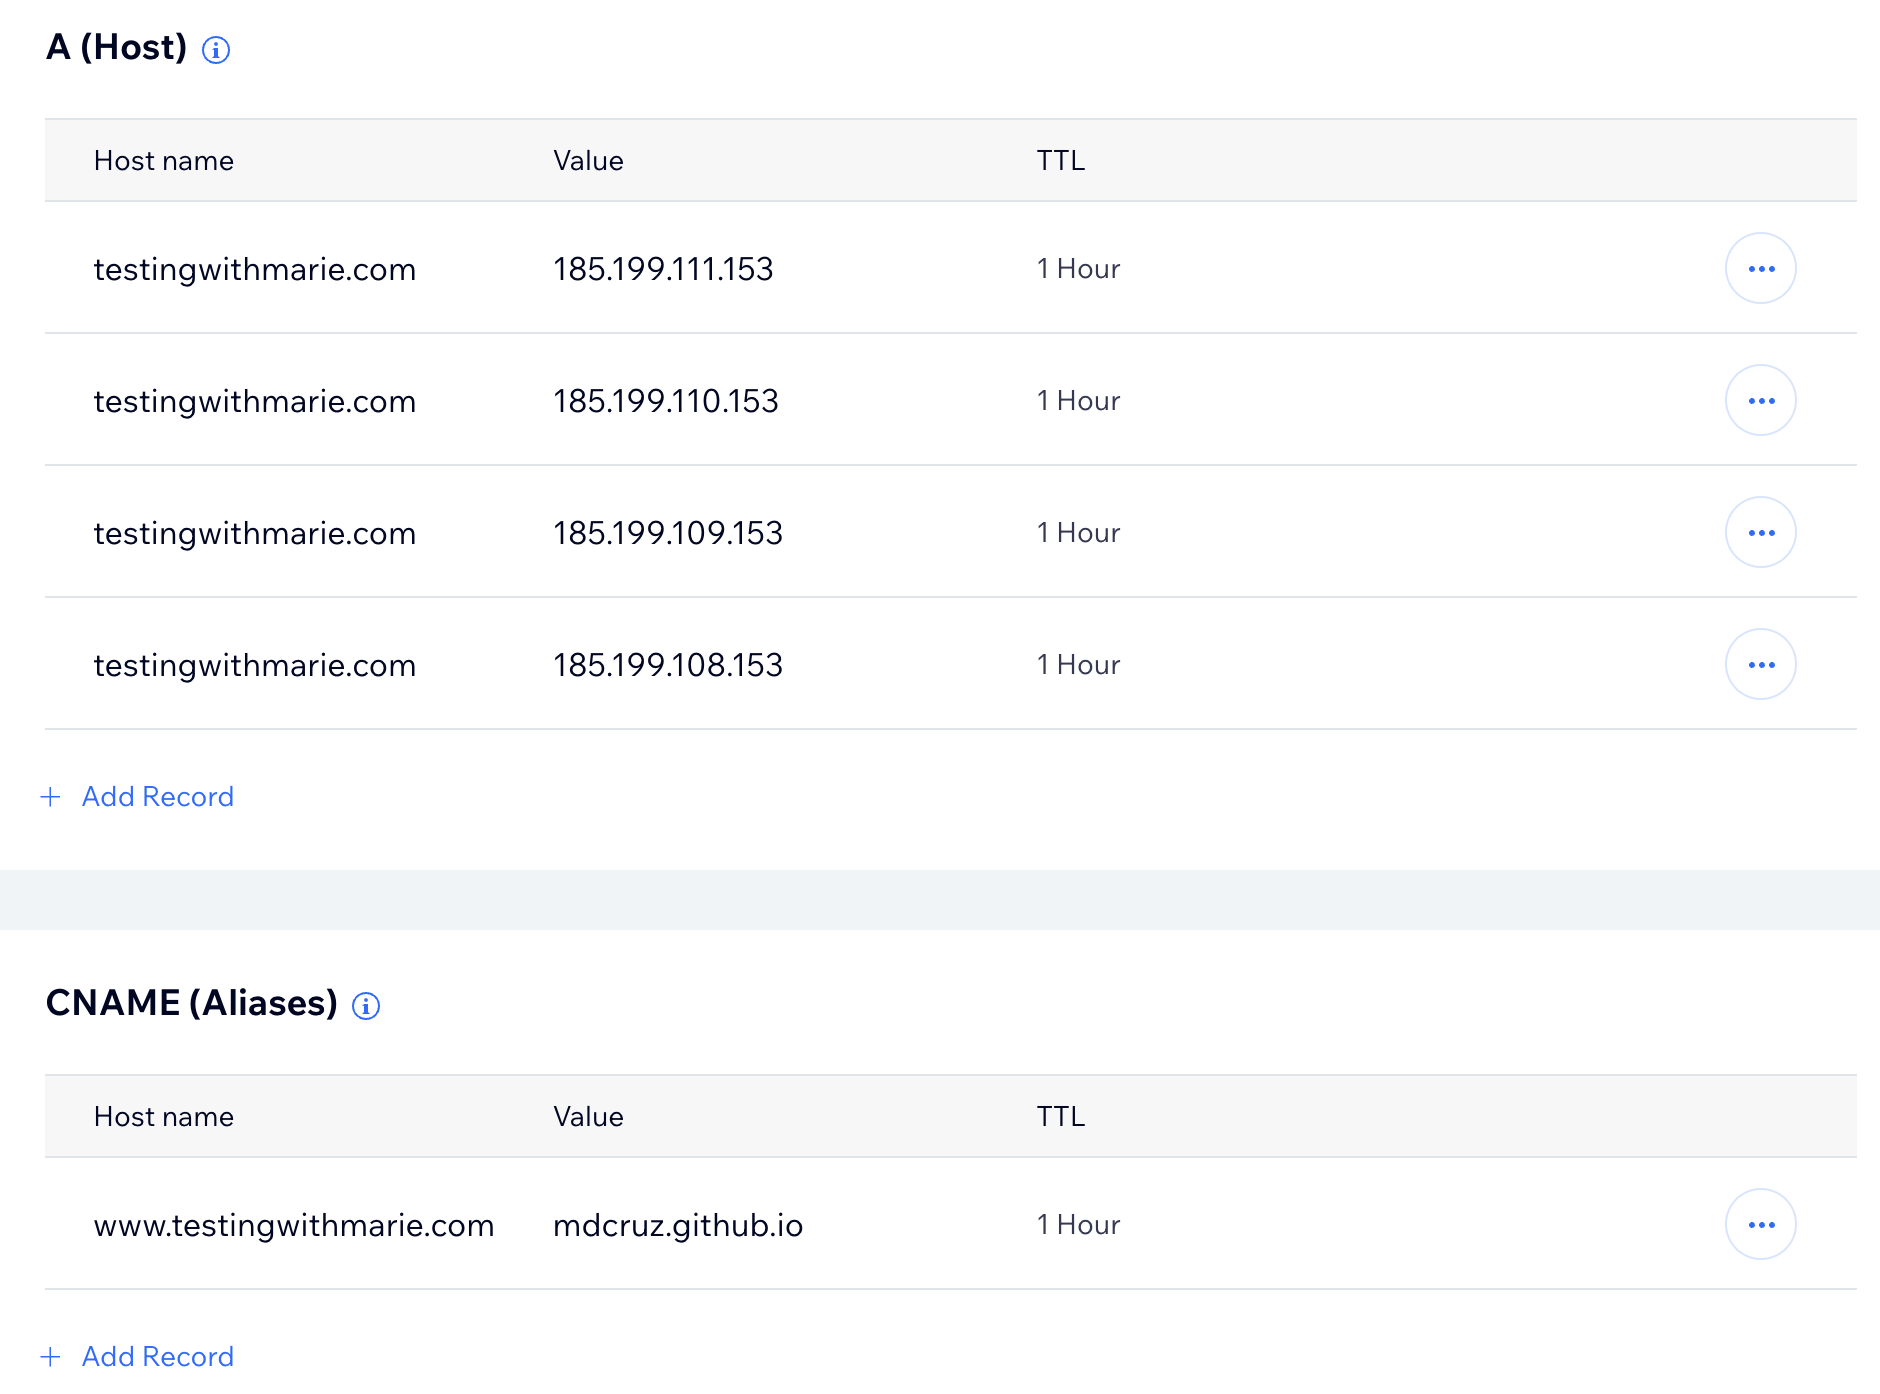
Next, you need to manage the DNS records for your domain. This step will vary from one domain provider to another, but essentially, you need to update the A and CNAME records for your domain.
For the A record, set the following values:
185.199.108.153185.199.109.153185.199.110.153185.199.111.153
For the CNAME, set the value to username.github.io.
The following screenshot shows the changes I did to my DNS record.

Once this is set, you might need to wait for up to 24 hours to see the site to your custom domain.
Wrapping up
Static sites are a great alternative to content management systems, and the good news is that they are entirely free! So, if you are looking for a way to get started with blogging or migrate an existing site or blog, then give Hugo and GitHub pages a try.